 |
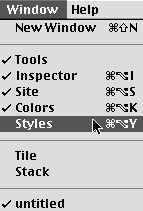
Using palettesThere are five palettes which you can use to control many of Freeway's features: · Tools palette tools allow you to create and edit items on Freeway's pages. · Inspector palette displays and controls page, box, export, group, form and text attributes and rules · Site palette shows the relationship between parts of your Web site (folders, pages, items and master pages). · Styles palette displays and applies the available text styles. · Colors palette displays and applies the available colors. The palettes are displayed by choosing their titles from the Window menu. Hide the palettes by clicking the Close box in the top left of their window, or choosing again from the Window menu.
Managing palettesYou'll find it useful to display or hide the various palettes, depending on which part of a document you're working on, and which palettes you actually need. Since you're unlikely to need them all on the screen at once, you can move them to different positions on screen, and resize and scroll some of them. Palettes have default locations when they are first displayed. You can move a palette to a more convenient part of the screen by dragging the title bar. Resizing a paletteYou can resize a palette using the resize box at its lower right. Alternatively, you can click the zoom box to automatically resize the palette to show as much of its contents as possible on the screen. Not all the palettes have these though.
Displaying palettesWhen you launch Freeway, the palettes and their positions are remembered from the last time you used Freeway. To display or hide a palette, choose its name from the Window menu. A check appears alongside current palettes in the Window menu. You can also click the Close box to hide the palette. Tools paletteThe Tools palette lets you create and edit items on the page.
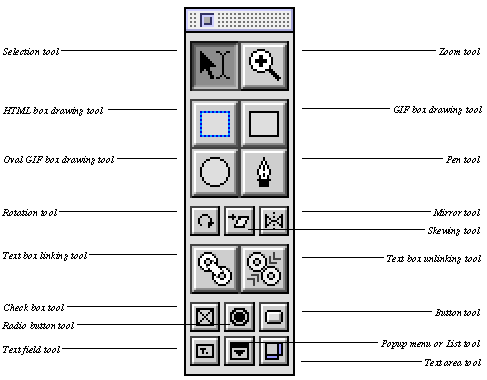
Working with the toolsSelecting a toolTo select a tool, click on its icon in the Tools palette. The shape of the cursor changes depending upon which tool is selected. If you select a tool while holding down the Option key, it remains selected after you've used it, so that you can use it again without reselecting it from the Tools palette. Otherwise, the Selection tool becomes active once you've completed drawing a box. You can modify how a drawing tool works by holding down Option after starting to draw a box; this makes the tool draw from the center outward instead of from corner to corner. In the same way, using Option modifies the Zoom tool by making it zoom out instead of in when you click with it. The drawing tools, transformation tools and linking tools are described in more detail in Working with items. Modifier keys Holding down certain keys on the keyboard while using any tool will alter the behavior of the tool until you release the key: · Option Temporarily changes any tool (except the Zoom tool) to a Grabber hand, allowing you to drag the page around within the window. · Command Temporarily changes to the Selection tool, allowing you to select, deselect or move items. · Control Temporarily changes to the Zoom tool. Selection toolThe Selection tool can be used to select, deselect, resize and move items on the page, highlight text or position the test insertion point within a run of text, pan graphics around within their boxes, and crop graphics by resizing their box. The pointer shape changes depending on its position. If the pointer is over a selected text box, or an empty box, it takes the shape of an I-beam (rather like an upper-case I). If you click with the I-beam inside a box, you can start entering text at the insertion point. Dragging with the I-beam highlights the text.
If the pointer is over the edge of a box, the pointer changes to a hollow pointer arrow, indicating that you can select the box by clicking there.
When the cursor is over a selection handle, it changes to a tail-less pointer arrow, indicating that dragging here will resize the box.
If the cursor is over a graphic, it changes to a grabber hand allowing you to pan the graphic around inside its box by clicking and dragging.
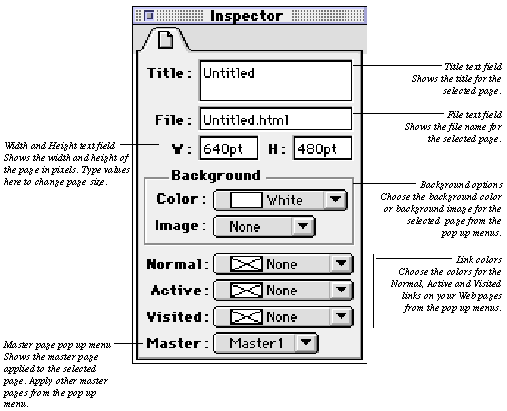
You can crop away parts of a graphic so that they do not appear in the output by resizing the box so as to make it smaller. Zoom toolYou use this tool to zoom the document display in and out. Click on the screen to zoom in by 25% increments or drag around the area of the screen you want to magnify. Hold down the Option key to zoom out by 25% decrements whilst clicking. Box and form control drawing toolsYou use the box drawing tools to create boxes which will hold the content of your Web pages. Freeway offers two main types of boxes drawing tools an HTML rectangle box drawing tool which creates boxes to hold HTML text, and three GIF box drawing tools which create boxes which export as GIF graphics. Inspector paletteThe Inspector palette plays a vital role in designing a Web site using Freeway, as it contains most of the options you need for controlling the appearance and attributes of pages, items, text and exported graphics. The options in the Inspector palette are grouped into separate panels, which appear and disappear as you work, so that at any point you're only offered the options relevant to what you're doing at that moment. When you have nothing selected on the page, the Inspector palette only offers the Page panel, but when you select an item on the page, you can then choose to work with options in the Export panel and the Item panel as well as the Page panel. When you select an item or highlight text, the front panel is the one you'll need most frequently, but to bring a hidden panel to the front, you can simply click on the tab for that panel. The following sections describe the most important of the Inspector palette's panels and the options on each, but there are other panels which will appear as you work which are documented in the relevant sections. When you're working with numeric values, you can type these into the text fields available. Confirm your entries in the text boxes by pressing Return or Enter once you're done, or if you're entering a series of values, you can use Tab to confirm your entry and move the cursor to the next field.
Page panel
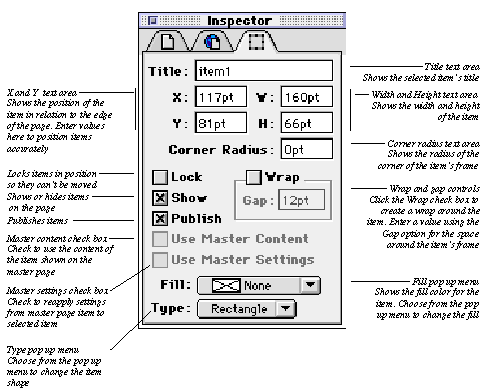
The Item panel allows you to modify items on your page, and appears when you have any single item selected.
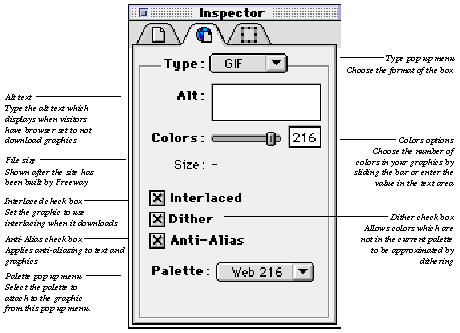
Export panelThe Export panel lets you set an item's values for when it and its contents if any are published from Freeway, and appears when you have any single item selected on the page, except for pass-through images. More information about the export options for the different formats of boxes is provided in the sections Working with Items and Working with Graphics.
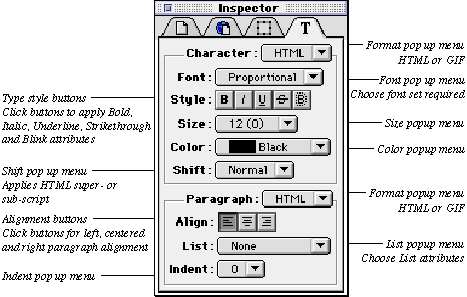
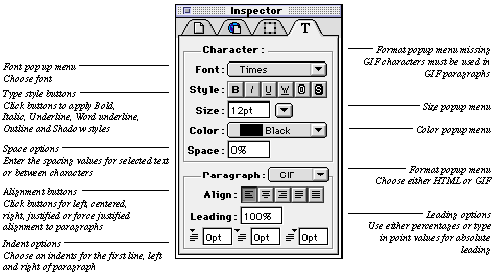
Text panelThe Text panel appears whenever you are working with text, and contains the formatting options available to you, depending on whether your text box is set to export as HTML or GIF. More information about the HTML and GIF attributes for text can be found in the sections Working with HTML character and paragraphs attributes and Working with GIF character and paragraph attributes.
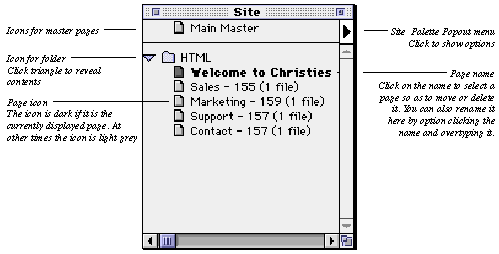
Site paletteThe Site palette displays the physical structure of your Web site, with the pages, master pages, items on the pages, and folders if any, represented by icons. Objects in the palette can be moved, renamed or deleted using the palette. The popout menu offers a selection of commands which let you create new pages, folders and master pages, and change the way objects in the palette are shown.
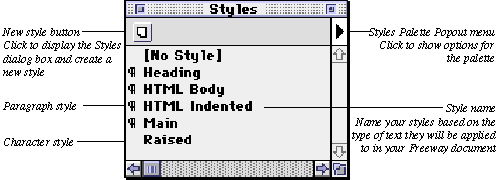
Styles paletteStyles form an integral part of working with text in Freeway, and the Styles palette is where you work with and apply styles. There are two ways in which styles are created in Freeway. You can either define them from scratch with the attributes you want, as in other applications, or Freeway will actually generate styles for you automatically as you work. Styles you create are called Permanent styles, and are shown in Bold in the palette. Styles which have been automatically generated by Freeway are called Temporary styles and are shown in a normal font. Another major advantage of the styles support in Freeway is that as well as paragraph-level stylesheets, you can also work with character-level styles. Paragraph styles are represented in the Palette with a paragraph symbol in front of their name in the palette, whereas those without this icon are character styles. You can create a new style from scratch using
the New Style button shown on the palette.
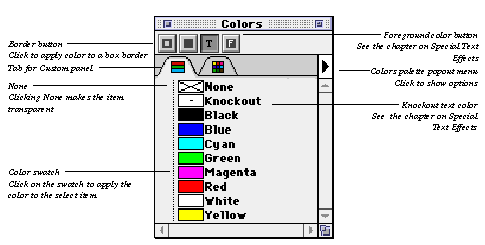
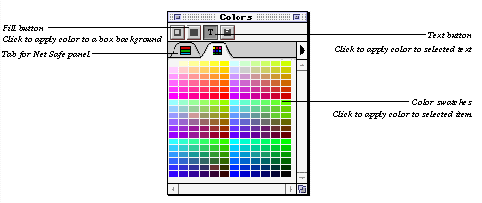
Colors paletteThe Colors palette offers two panels: the Custom panel and the Netsafe panel. Custom colors panel displays the colors which are available in a document. Colors are shown as small swatches with their names alongside. Colors in bold type are permanent colors, which remain available in a document whether or not they are used. Colors in plain type are temporary colors, which are only listed if they are currently applied to an object. You delete an object from a document, any temporary colors associated with it disappear from the palette. Command-click on a color's name in the Colors palette to edit that color. The Netsafe panel allows you to select a color by clicking on one of the 216 netsafe colors from the palette. This color is then added to the Custom color panel and named Color 1, Color 2 and so on. You can rename these colors. Working with color provides more details on how you can use color within Freeway.
|
||||
Back to the top |
|||
